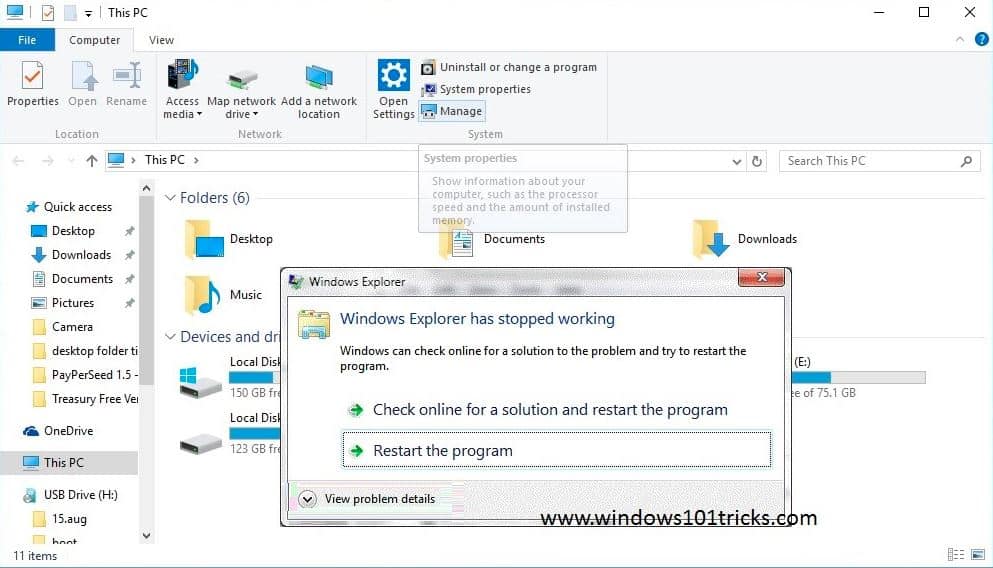
Are you getting Windows Explorer Keep Crashing or Windows explorer has stopped working issue? Also, Some Users report After install Windows 10 file explorer not responding on right-click. For some Others, Windows explorer keeps crashing continually or Windows explorer has stopped working frequently. If you’re facing this issue where when you open File Explorer in Windows 10 it keeps on crashing every time you open it, Here some applicable solutions to fix this.
What is Windows Explorer?
Windows Explorer (Microsoft renamed Windows Explorer to File Explorer in Windows 10 and 8.1) is an important part of windows, which helps us browse our files, folders, and other data on our computer. It is one of the backbones of the operating system powering not only file browsing and operations but also the taskbar and start menu.
Fix Windows Explorer Keep Crashing
Unfortunately, there are dozens of reasons why Windows Explorer crashes. Such as the users who don’t update windows regularly are the main victim of it. some other things are Outdated windows, Corrupted system files, Virus Malware infection, Third-party incompatible programs etc. Follow bellow solutions To fix Windows Explorer has stopped working, windows explorer not responding, Keeps Restarting and crashes frequently etc on windows 10, 8.1 and win 7 computers.
Check For Virus malware Infection
First, perform a full system scan to make sure virus/malware infection not causing the issue. We recommend first Installing a Good Antivirus, Antimalware application with the latest updates and performing A Full System Scan. Also Install a Third-party System optimizer like Ccleaner to clean junk, cache, memory dump, and temp files, and fix Registry Errors.
Keep Windows up to date
Microsoft Regularly drops windows updates with security improvements and bug fixes to patch the security hole created by third-party applications. Installing the latest update may fix If any update bug causing the issue. So make sure windows have installed the latest windows updates, Or you can check the latest updates from Settings -> Update & Security -> windows update -> check for updates.
Run System File Checker
Again Corrupted missing system files mostly cause this Windows 10 explorer.exe not responding problem. We recommend running the System File Checker tool (SFC.exe) which scans all the Windows operating system files and will replace all the corrupted, damaged or incorrect files present on your computer.
To Run the System File Checker
- First, open the command prompt as administrator.
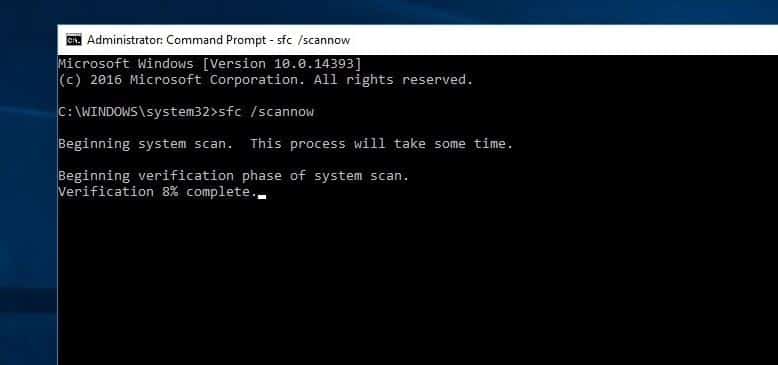
- Then type the command sfc /scannow and hit the enter key to execute the command.
- This will check and scan for missing, corrupted, or incorrect files present on your computer.
- If found any the SFC utility will replace them from a compressed folder located on %WinDir%\System32\dllcache.
- The system scan process will take some time so just keep patience and wait for 100% scanning.
After that Restart windows and check Windows Explorer problem is fixed. If SFC failed to restore missing corrupted system files, SFC scan results found corrupted system files but unable to repair them then Run the DISM command. Which repairs the system image and enables SFC to do its job.
Disable Startup Programs
If you have installed a lot of Windows software and applications on your computer, it is obvious that it will take a lot of time to process all those programs which might lead to Windows 10 file explorer hangs and file explorer not responding in Windows 10 PC.
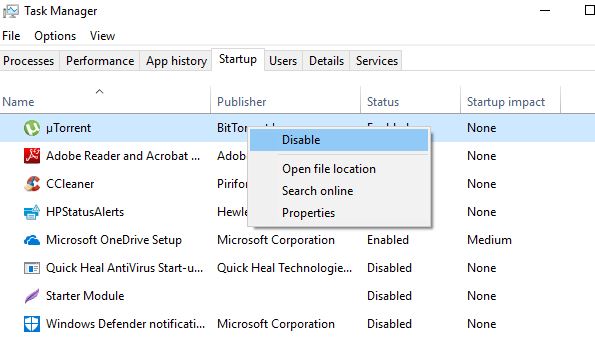
That causes you need to stop programs from running at startup which may very helpful to fix Windows Explorer Keep Crashing, file explorer has Stopped working, etc. To Disable Startup programs Open task manager by right click on the taskbar and select Task Manager. Then move to the “Startup” tab and you will see a list of programs that run at startup. Right-click on the applications that you don’t want to run at startup and select “Disable”.
Uninstall the Recently Installed Program Completely
If you face this problem ( Explorer keeps Restarting ) after installing a Third-party application or program. Then may This Application Not Compatible with Windows or contains a Virus so that this problem happened and uninstalling the Application may Fix your problem. To do this press Win + R, type appwiz.cpl and hit the enter key. Now when the uninstall and change program Screen opens select the recently installed application Right-click on it and select uninstall to Completely Remove the program from your system.
Update Graphics Card Driver
Sometimes your graphics card issues may create windows explorer unresponsive or problematic. It is possible that the video card problem is creating the restarting loop of explorer.exe. So, Try to update the graphics card and see if it fixes the problem. To update the Graphics driver on windows 10 Right Press win + R type devmgmt.msc and hit the enter key. This will open Device Manager. This will display all installed device drivers Now expand the display adapters select your installed graphics Driver, right-click on it and select Update Driver software.
Launch Folder Windows In A Separate Process
Open the Control panel then on small icon view look for the file explorer option and double-click on it. Then Tap on the View pane, Tick on Launch folder windows in a separate process in Advanced settings. Click Apply > OK. Then press the Windows logo key and E at the same time to open your File Explorer and check to see if it works fine.
Copy Explorer.exe to System 32 Folder
Some Times Copy the Explorer.exe to System 32 Folder can fix this issue. Here how to Do first open this pc –> Windows installed Drive ( C Drive ) –> Windows –> and find out the explorer folder right click on it and select copy. Now look for System 32 folder on the Same directory open the folder and paste the copied Explorer folder here TThat’sit.
Tweak Registry to Delete Corrupted explorer.exe
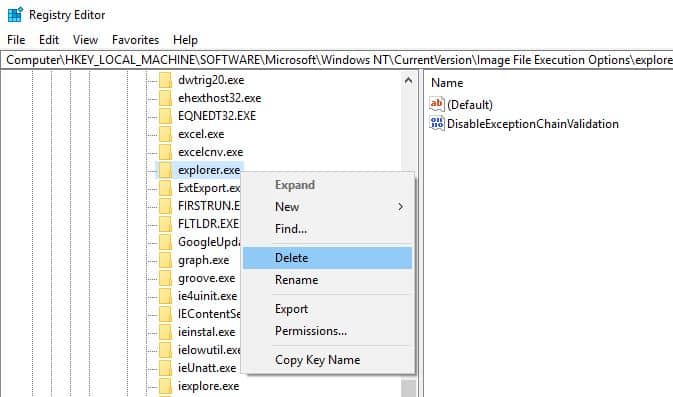
If all above solutions failed to fix Then perform steps below and Delete the Corrupted explorer.exe which may cause the issue. To do this press Win + R, type regedit and hit the enter key. This will open Windows registry editor, we are going to tweak registry editor so first take Backup Windows registry. Now navigate to the following key :
HKEY_LOCAL_MACHINE\SOFTWARE\Microsoft\WindowsNT\CurrentVersion\Image File Execution Options
Here right click on “explorer.exe” from the left sidebar and delete. Then Close the Registry editor and restart windows to take effect the changes. On the next login check, there is no Windows Explorer Crashing or Stopped working issue.
Run netsh and Winsock reset
Type cmd in the search box from Start. Then right-click Command Prompt to select Run as administrator. Click Yes when prompted by the User Account Control. Type the following command in the Command Prompt window and press Enter to run it.
netsh winsock reset
Reboot your Windows 10, Press the Windows logo key and E at the same time to open your File Explorer and check to see if it works fine.
These are some most applicable solutions to fix Windows explorer keeps crashing continually or Windows explorer has stopped working frequently issue on the windows computer. I hope to Apply this solution fix the Windows Explorer problem and run windows smoothly. Still have any query, or suggestions or face any difficulty while applying these solutions feel free to comment below.
Also, read
- Getting Windows ready Don’t turn off your computer Windows 10 Stuck
- Fix Windows Explorer has Stopped Working on windows 10
- How to Remove onedrive from windows 10 File Explorer
- Windows 10 Freezes continuously and Auto Restart with BSOD
- Fix windows explorer stopped working, Keeps Restarting and Crashing


